This is the focus of an Extended Project Qualification by one of our computing students.
Adam is researching this question and as part of the project has created a game in Unity. A demo of this game was shown in the lab a few weeks ago and a clip is available below:
To continue our Lower 5th (year 9) exploration of programming we moved onto linking up Python to Minecraft. This is such as simple way of engaging students in a different way and it helps us spot the real ‘programmers’ from the ‘consumers’ of computing. Whilst some are happy to just follow the worksheets others really catch on and alter the code and explore – whilst this is not working with robots, I do feel it gives a nice concrete experience and, just like Papert and his logo, allows students to situate their learning.
One pair of students wanted to ‘replace blocks in front with air’ and with this working they were really pleased that they could run through mountains. When they suddenly started running through the sea we had a Moses moment as the sea parted in front of them.
LED matrix boards
There is always something satisfying with lighting up LEDs and the use of 32×32 matrix boards allows for a variety of effects. We have been exploring how 4 can be linked up and will be looking to implement the ‘pixel pusher’ code that is available on GitHub. We should then be able to push images and other files to the matrix board from other computers – which should be fun for the students to have a go at.
Philips Hue
To add to the interactive side of Q4 we are investigating the use of Philips Hue lights and have setup a LED strip and a normal bulb (inside a robotic face). With the use of a Python library from GitHub it is quite easy to interact with the lights and now need to take these experiments a bit further and consider how we can use the colours to represent some sort of school activity.
Welcome to what will be our regular review of the explorations of computer science in our computer lab.
Jam Sandwiches
One of our ‘tried and tested’ lessons for getting students to initially think about algorithms and how computers process them was again well received this week.
The idea of this lesson is to get students to think about the necessary detail that a computer needs and how we, as humans, can interpret instructions with a lot more intelligence. To run the jam sandwich algorithm we pick a suitable student entry and then follow the instructions carefully….
No images or videos were allowed from the lesson but the instruction ‘spread butter onto faces‘ was followed literally.
Brainpad
The sixth formers continue to explore programming C# with the Brainpad devices and we have moved on to consider a bit of object oriented programming as this is now written more formally into the A-level specification. Having introduced the concepts of classes, objects, properties and methods we have set a challenge for the students to follow based around basic shapes. It is always pleasing, however, to see some students push off in their own direction and below is a clip of an idea currently being developed by Adam where ‘people’ live on the Brainpad and they can be interacted with.
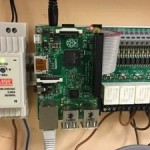
Raspberry Pi
Having recently trained as a Raspberry Pi Educator there is a greater determination to make use of our 10 Pi’s. To push the experience forwards we upgraded the Pi’s to the latest model as this does make the response times and feel of the UI a lot better. Using the CamJam kits we have had students exploring how to connect up LEDs and switches using a breadboard and then programmed via Scratch. We will be moving onto using Python over the next few lessons.
Oculus Rift
James and Alex are working very hard to produce a simulation of the pod race used in Star Wars shown below:
It is taking them a long time to create the scenery using Unity but their determination is paying off and it is beginning to look impressive. Can’t wait to put on the Oculus Rift and then have a go!
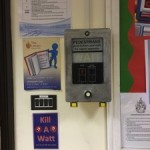
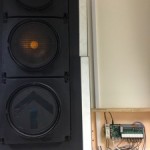
Traffic Lights
The project of making the traffic lights more interactive continues and this week we have had the pedestrian box wired up and connected across to the Raspberry Pi / Unipi control system. With a tweak of the control program we can have the pedestrian box light up when the button is pressed and then after ten seconds turn off….. then we need the lights to go mad!
One of the key parts of the A-level computing course is the completion of a piece of extended coursework. With a group of students working on a variety of devices it can be hard to keep track of the state of the coding completed by each student.
For a long time we have used Google Docs as a means of supervising the documentation of the project and this has worked very well. Both students and teachers have found the ability to comment on each others work and to gently nudge completion as an effective way of keeping the documentation moving forwards and we have been on the look out for a means of applying similar ideas to the coding.
Having tried out a few ideas we have settled on using Koding. We have subscribed one account so that we can have an always on virtual machine and then shared this VM out to teachers and students. The other teachers and students only need to create a free account (even better if they use the referral link from the first paid for account as this then increased your storage!).
Koding means that students can edit in a browser (anytime/anywhere) and also see their code working. It also means that they can comment and look at the other projects which helps everybody move forwards.
We have also setup a GitHub account for the school and setup a repository for the A2 projects which means that we can pull code over to the Koding VM (and push back regularly as the students make changes). This just gives us another backup of the code and also gets the students use to the idea of using GitHub for software development.
Will put up another post as we find out how this works but so far so good.
Our students are currently working on a controlled assessment task for GCSE Computing and they are coming up with some interesting insights.
One student was looking at the command:
ls > mylist
And he was interested to see that the contents of the ls command actually had the mylist file as part of the listing even though the ‘ls command comes first’ as commented by the student.
So does the ls command run first (in which case the directory listing would not yet have the file mylist) was the question or perhaps the computer has to create the mylist file first so that it can then pipe the output from the ls command into the newly created file…..
Having run this task last year we are encouraging students to be a bit more inquisitive and this was a great example of a student ‘accidentally’ spotting something and then developing this into a question to be answered. Final comment was ‘you better make sure you write this up!’.
The investigation task for OCR GCSE Computing is a nice activity if students find time to actually ask questions and look to dig away at the the prescribed tasks to find out further interesting nuggets.
One of the key topics for both GCSE and A-level Computing is data representation. Along with the usual number work (binary!) we are expected to look at how sounds and images are represented on a computer.
Whilst the theory behind this is not too complex – most students can appreciate what a pixel is and a sound sample – how it all hangs together to actually make an image and sound could do with being explored a bit further.
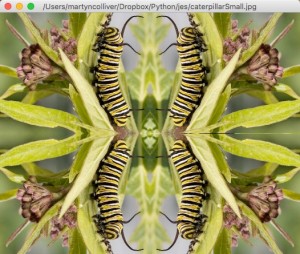
This year we have found JES (Jython environment for students) which provides a simple interface and functions that allow you to work with both images and sounds using Python code.
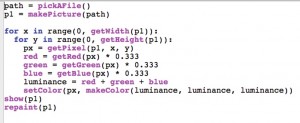
With a few lines of code you can pick an image file and then start to manipulate it pixel by pixel. It is quite easy to convert to greyscale or morph off into different colours.
A challenge was to take an original image of one caterpillar and then, with the same image size, turn it into a four smaller images.
It was great to come into a lesson and find one student having created a ‘musical expression of an image’. Basically his Python code looks at the pixel data of the image and represents the pixel data as a note. It was quite interesting to see how different images responded to his code and you could begin to pick up patterns and therefore relate how parts of the image created different sounds. Has the Mona Lisa ever been so musical?
Vector graphics has for a long time been part of the specification for both GCSE and A-level computing yet we have struggled to find an easy solution to allowing students to really manipulate the language behind the graphics and then visualise the image.
Having found a reference to SVG graphics in Kevin Bond’s new textbook for the A-level computing course we set out on exploring this area and seeing what our students could come up with in a 50 minute lesson.
With a few SVG tags and primitives like rectangle, line and circle you can quickly build up an image and also focus on the idea of a vector image being made up of objects and properties. You can even zoom in and look at how the bowser responds by re-drawing the image – no pixellation with these.
We also did an experiment to look at relative file sizes using the house image below made from SVG and then taking a screen capture and saving in a variety of formats.
SVG file – 1.6 KB – can compress down to 0.4 KB
PNG file – 4.5 KB
JPG file – 17 KB
GIF file – 29 KB
So we also had a discussion over file format and the idea of compression both lossless and lossy.
The Q4 computer lab is based in a UK secondary school where we teach computing across the 11-18 age range.
In the Q4 computer lab we aim to inspire creativity and curiosity in our students by working with new technologies, providing excellent lessons and support and having an open door policy for exploration.
Keep an eye on this blog as we keep it updated with our adventures.